Think you can’t love backbends? You can. I promise, promise, promise. Backbends have always been — and still are — challenging for me. Even as a child, when I’d do an arabesque or a port de bras – both backbends in their own way – in ballet class, my back just looked flat and felt crunchy.
Early on in my practice, my desire to do deep backbends meant that I’d push myself too far and wind up feeling really awful the next day. Two things eventually happened that changed this pattern: First, I got curious about what was obstructing my backbends – was it really just my spine? Because that’s where all of my focus had been. When I started doing this self-inquiry, it became clear that it wasn’t. In some poses, it was that I hadn’t yet focused on the actions of the shoulder blades, while in other poses my tight hip flexors and quadriceps were limiting my range of motion. When I started to asking questions and investigating, things got infinitely more interesting and fun.
The second thing that happened was that I attended enough different yoga classes that I learned to use props. This was a complete game-changer for me. In this day and age of the fast-flow yoga obsession, props get a bad rap: They’re considered cumbersome or people feel embarrassed to use them. But I can attest that using just two blocks or a bolster can give you just the lift you need to go from crunchy and painful backbends to that heart-open, soaring feeling you crave.
So, without further ado, here are my favorite ways to make my backbends feel more open, spacious, and supported. Once you learn them, you can incorporate them into your regular practice without interrupting the flow and I promise you will notice a difference.
See also The Mother of All Backbends: Urdhva Dhanurasana
An alignment note: Jason often teaches how important it is to initiate backbends from the pelvis, and I agree. Initiate your forward bends by tilting the pelvis forward and initiate your backbends by tilting the pelvis – you guessed it – back.
To feel what that means, stand in Tadasana with your hands touching the bony protrusions on the front of your hips. Now, draw the hip points up (they won’t actually move very far in space) and gently drawing your abdomen back. Instead of letting your tailbone point back, think of drawing it down as though you were going to dig a hole in the ground with it. Aim for this position in all of your backbends.
5 Ways to Use Yoga Props for Backbends
1. Upward-Facing Dog
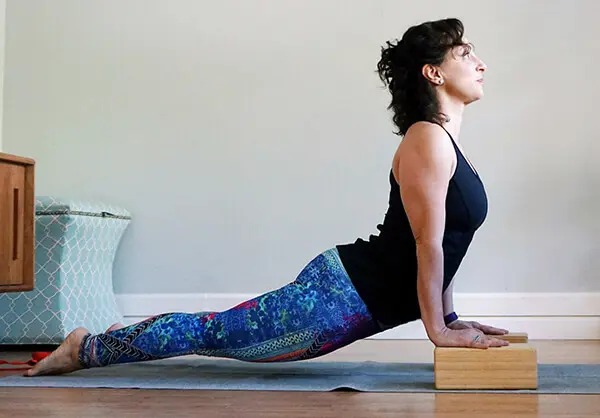
Placing your hands on blocks in Updog gives you more space to get your pelvis into position and pull your chest through your arms. Once you get the sensation of broadness in your chest, you can start to draw your shoulder heads back and lift your breastbone up.
How to
Place your blocks on your mat, shoulder distance apart. Place your hands on the blocks and prepare for the pose: With your elbows bent, draw your shoulder heads back and feel your shoulder blades moving toward your spine. Gently draw your abdomen back and lengthen your low back.
Now, lift up into the pose and work your legs. Work your legs! They are the supporting players in your body’s ensemble – draw your quads up, squeeze your inner thighs toward each other and hug your outer ankles in. Do you feel brighter, lighter, more lifted in your Updog now?
2. Dhanurasana
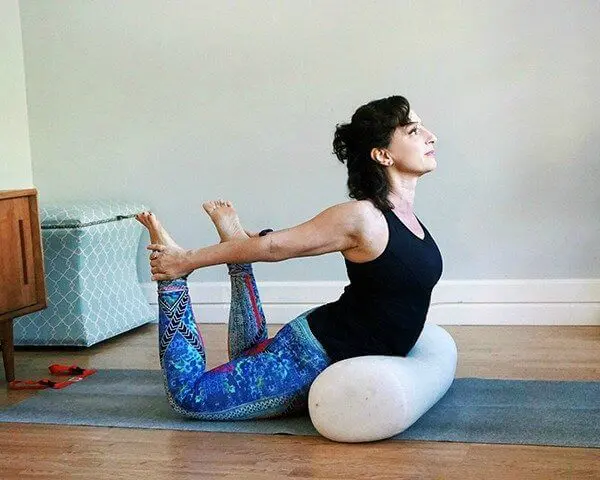
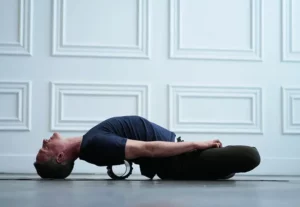
If given the choice, I would always do Dhanurasana on a bolster. My experience of this propped variation is that the bolster gives me the boost I need to really lift my chest and it presses into my abdomen and helps me keep my lower back long.
How to
It may take some time for you to find just the right place for the bolster. If it’s too far back, you’ll do a faceplant. If it’s too far forward you’ll compress your bottom ribs. Ideally, it will be underneath the front of your pelvis – so across the pubic bone.
Once you feel like it’s in the right place, place your fingertips on the floor in front of you, bend your knees and lift your chest. Reach back and grab your outer ankles. Then strongly kick your shins back into your hands and straight up toward the ceiling. Allow your shoulder blades to squeeze together and lift your breastbone. Keep your lower back long.
3. Camel
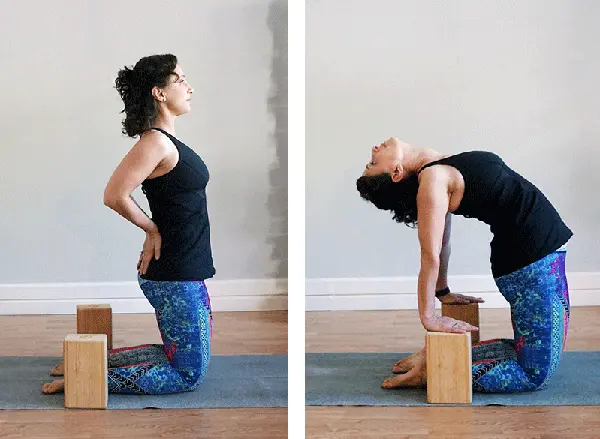
Using blocks Camel Pose can help you remain aligned and stable in your lower body. When your pelvis and lower body are stable in backbends, you’re less likely to “sit in” (i.e. compress) your lower back.
How to
Stand on your shins with a block on either side of your outer ankles. Look down and see that your knees are directly beneath your hips. Squeeze your inner legs together so that you feel supported. Bring your hands to your lower back, fingertips pointing down – let this serve as a tactile cue to keep your low back long. From there, inhale as you lift, lift, lift your breastbone and arch back. Bring your hands to the blocks and press down into them. Allow your heart to rebound up toward the ceiling. Keep your lower back long.
4. King Arthur’s Pose — The Road to Eka Pada Rajakapotasana II
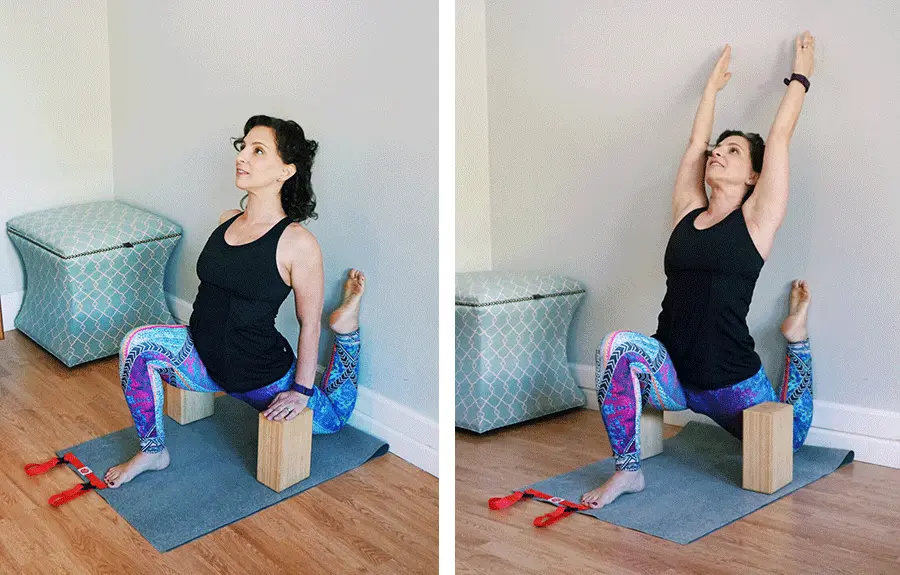
There’s no variation that helps me more with the Pigeon series than King Arthur’s Pose. It’s incredibly efficient at opening the hip flexors and quadriceps while your knee is flexed (which is the same position your legs are in for full Pigeon). It also gives you the opportunity to practice keeping your pelvis and lower body stable while you lift your chest and start to backbend toward the wall.
How To
If you have sensitive knees, fold a blanket or grab a pillow and place it against the wall. Set up two blocks so that they’re near your mat. To get into the pose, come into a standing forward bend with very bent knees and your fingertips on the floor. Bend your left knee and place your shin against the wall. Slide it down until your knee is on the floor and against the wall. Then step your right foot forward between your hands.
Press your shin against the wall and tilt your pelvis back. Place your hands on the blocks and stay. Breathe. Stay. Curse the gods. And stay a little longer.
If you feel stable here, lift your chest, and draw your arms up by your ears. If you want to go deeper, keep lifting your chest and reach your hands back toward the wall. You are almost in Eka Pada Rajakapotasana II! This is your version of the pose, so own it.
5. Urdhva Dhanurasana (aka Upward Bow or Wheel Pose)
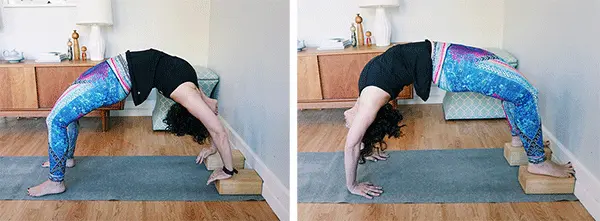
I like placing the blocks under my feet in this pose, because I have extremely tight hip flexors and quads. If your shoulders are tight, you might prefer the blocks under your hands. Better yet, try both and feel the difference.
How to
Do this pose only after a good, thorough backbending sequence! You can find a full sequence to Urdhva Dhanurasana here. The set up for both of these is the same: Place your blocks on your mat against a wall. Lie back and place your hands on the edge of the blocks. For this version of the pose, I suggest coming up in one breath (not resting on the head). Take a big breath in, then exhale and use your arms and legs to press up into the pose. Draw your tailbone toward your knees and lift your breastbone straight up toward the ceiling. Stay for a few breaths and then slowly lower down. Rest for a few breaths, then try placing your feet on the blocks and repeat the instructions above.
If you need more details about how to get into Urdhva Dhanurasana, you can check out the full pose breakdown here.
Let me know how it goes and if you have any favorites to add in the comments!
