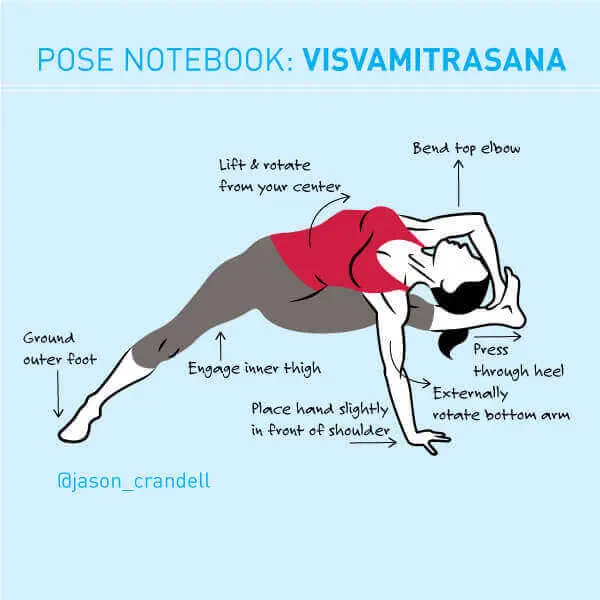
Visvamitrasana is a big, bold arm-balance that requires equal parts hamstring flexibility, core strength, and core stabilization. We all know that yoga goes much deeper than looks, but, damn, this pose is as beautiful as they come. Here’s my guide to helping you and your students develop this posture.
Key Takeaway for Practicing Visvamitrasana
When transitioning into Visvamitrasana you’ll shift your weight onto your bottom arm. There’s a moment or two during this transition when your bottom shoulder is vulnerable. It’s vulnerable because your bottom arm will internally rotate and abduct. In other words, your bottom elbow will flare slightly when you tuck your arm under your thigh while you’re setting up for the pose. This is a relatively unstable position for your shoulder, especially when it’s bearing weight.
There’s no way to completely avoid this position when you’re setting up for Visvamitrasana. But, you can remedy the situation before you transfer weight onto your shoulder. This requires two steps. First, strongly hug your elbow toward your body as soon as you start to lean weight onto your arm. This will minimize the flaring of your elbow and help stabilize your shoulder. As you lean more and more of your weight onto your arm — and prepare to lift your front foot — straighten and externally rotate your bottom arm. This means you’ll be gently rotating your bottom elbow crease toward the front of the mat.
Second, pull your bottom shoulder blade away from your ear and firm it against your back. Readjusting your bottom arm so that your elbow is no longer flaring and your scapular muscles are engaged will give you more depth and safety in the posture.
WARM UP
I love preparing my students for Visvamitrasana because the posture has so many layers. It’s an arm balance, a side bend, a core strengthener, a hamstring opener, and an adductor opener. It also requires a technical understanding of how to keep your shoulders stable. Consider all of these points when you’re warming up. Obviously, several Sun Salutations of any variety will get your whole body warmed up. Feel free to do as many as you like. Standing postures such as Triangle Pose, Half Moon Pose, and Wide-Legged Standing Forward Bend will help prepare your hamstrings. Squats like Malasana and Horse Stance will help stretch your adductors. And, side bends like Parivrtta Janu Sirsasana and Parighasana will prepare your side body for the demands of Visvamitrasana
HOW-TO DO VISVAMITRASANA
1. Start in Warrior II with your right foot forward.
2. Learn forward and tuck your right elbow behind your front knee. Snuggle it as deeply as it will go. Those of you that have seriously flexible hamstrings and adductors—and the right proportions for the job—may be able to sneak your shoulder all the way behind your knee. Place your right hand on the floor several inches to the right of your foot. Make sure your fingers are facing the front of your mat. Don’t worry about your top hand yet. We’ll get to it soon.
3. Now, you’re in the phase of the posture that I discussed in the “one quick tip.” You have to flare your elbow to get it into position, but you won’t keep it this way. Begin leaning your weight onto your hand and hug your elbow toward your body.
4. As you transfer more weight onto your bottom arm, straighten your elbow. To stabilize your shoulder, externally rotate your arm and draw your shoulder blade down your back. Now, take hold of your front foot with your left (top) hand.
5. You’re ready for take off. Press your front hand strongly into the floor and lift your front foot. Straighten your front leg as much as possible. Lift your hips and thoroughly engage your back leg. You’re there! Now, refine the pose with infographic above. Get a selfie of the pose and use at as a banner ad on your homepage.
6. Stay in the pose for a few breaths before lowering down and transitioning to the second side.
{illustration by MCKIBILLO}


